

How To Take a Screenshot on a Mac
Taking screenshots on a Mac isn't as simple as it is on the most pop computing platform beyond the globe, i.e., Microsoft Windows, and if you've made a switch from the latter to the old recently, yous would understand exactly what I mean. You'd have found yourself looking for the familiar Print Screen fundamental on the keyboard, simply to realize that it doesn't exist in the earth of OS X. What'due south more than, there's no evident and apparent way that will permit y'all save whatever you lot have going on on your screen equally an image. Well, while capturing screenshots on Os X might not be as like shooting fish in a barrel as it is on Windows, it's still fairly uncomplicated, and in this article, we'll tell you all at that place is to know virtually screenshots on a Mac machine.
Taking a screenshot on a Mac using keyboard shortcuts
Keyboard shortcuts are the virtually natural and logical way of getting effectually in an operating organisation, and thus, Mac supports a number of shortcuts that you can employ to salve screenshots in dissimilar fashions of your desktop. Let's have a closer look at all the available options here.
Salve screenshot of the entire screen to Desktop
If you desire to but capture the entire screen (or screens, depending on your setup) and save it as an image file in the default format to your Desktop, the keyboard shortcut would be this:
Command + Shift + 3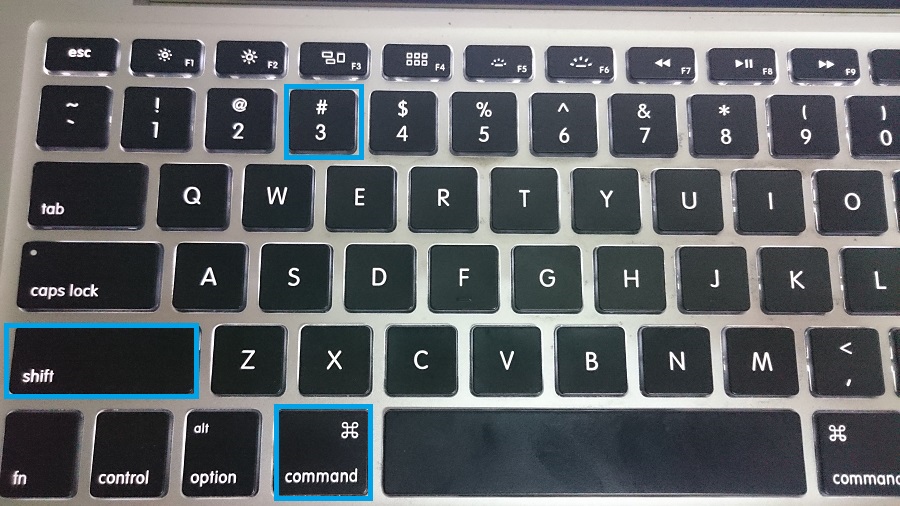
Save screenshot of a certain expanse to Desktop
Assuming y'all don't desire to capture the entire screen, but but a particular area within, and save it to the Desktop, your shortcut will change slightly. The combination that you'll at present apply will be:
Command + Shift + 4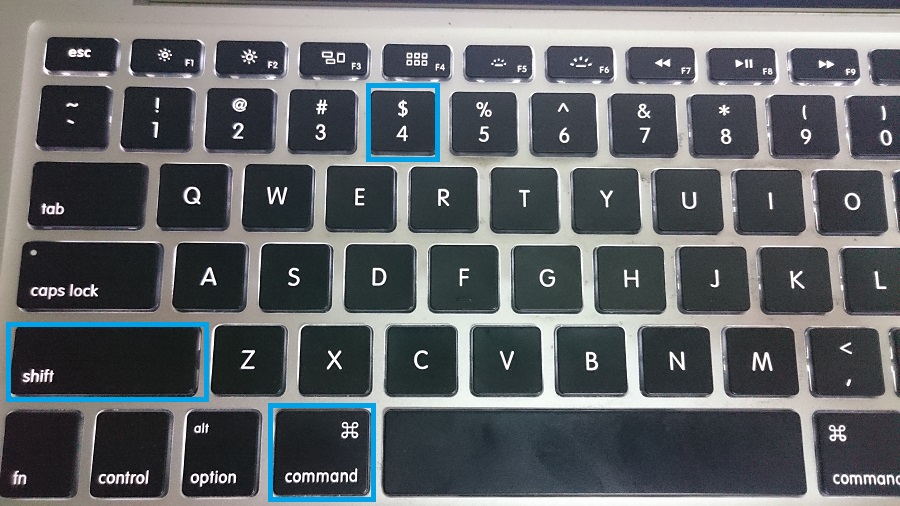
Doing then will turn your mouse pointer into a crosshair, which you tin click & drag to identify the screen region that needs to be captured. As shortly as y'all allow become, the selected area will be captured as saved to your Desktop as an image file.
Salvage screenshot of a window to Desktop
Suppose the area that you desire to capture in your screenshot really constitutes an application window, which you might need to showcase for an article like this. Your shortcut from previous one will alter slightly, whereby yous volition apply Control + Shift + 4, and when the cursor turns to crosshairs, instead of dragging with the mouse, you hitting the Space key, and and then click the window that y'all want to capture. Hence, the syntax would await like:
Command + Shift + 4 -> hitting Space -> click the window that needs to be captured
Take screenshot of unabridged screen and copy to clipboard
The three methods described above basically put an image file on your Desktop without any other options. Generally, that's what you'd prefer, besides. However, what if you desire to re-create the screenshot of your Mac's entire screen to your clipboard for immediate reuse. Hither, shortcut will get slightly modified:
Command + Control + Shift + 3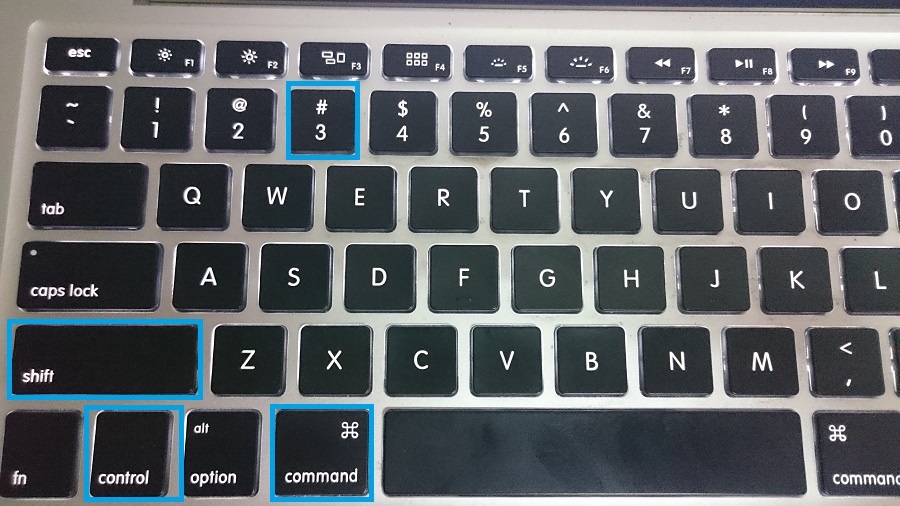
With the addition of Command in the mix, your screenshots volition become to the clipboard instead of getting saved on the Desktop.
Take screenshot of selected region and copy to clipboard
Following the same principle as above, y'all volition change your keyboard shortcut for region capture with the addition of a Control to it. Hence, y'all will hitting:
Command + Control + Shift + 4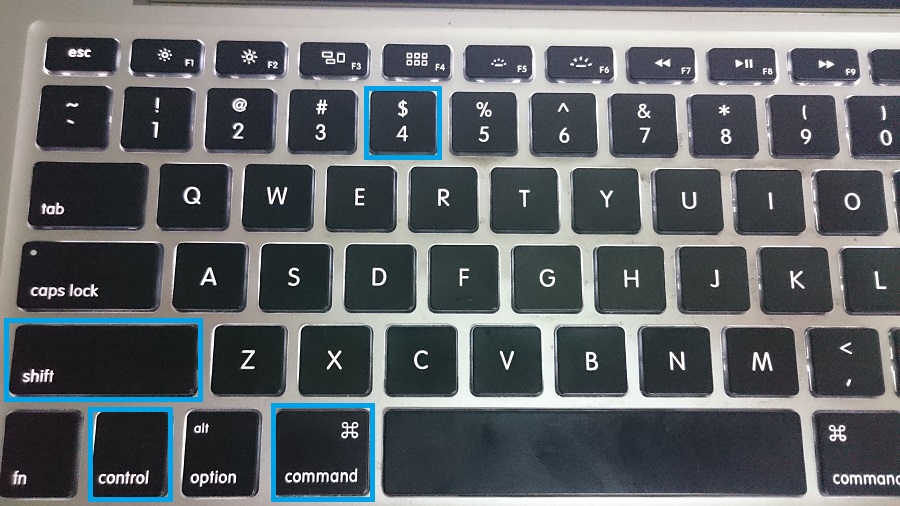
And the cursor will turn to crosshairs, allowing you to define the region that needs to be captured and copied to clipboard.
Accept screenshot of a window and copy to clipboard
Every bit you might've guessed it past now, the same pattern with the addition of Control applies here, besides. Instead of doing just Command + Shift + 4 and then Space key, yous'll use the post-obit combination:
Control + Control + Shift + 4 -> Space -> Click Window to Capture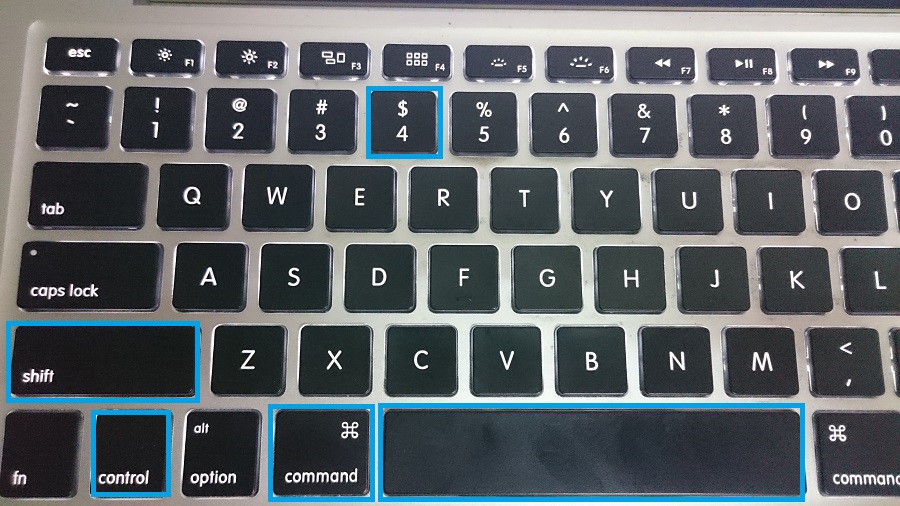
The prototype will be copied to clipboard and will exist gear up for reuse as y'all see fit.
Keyboard shortcut modifiers for avant-garde screenshot manipulation on Mac
While on the subject of taking Mac screenshots using keyboard shortcuts, in that location are certain keys that you can use in conjunction with those described higher up to achieve certain results. Please remember that these are applicable only when you lot're going for region capture (whether save to Desktop or re-create to clipboard), and will not work if you're using full-screen screenshots. As well, they piece of work only on OS Ten Leopard and above.
Space Key
During region capture, once you accept drawn a region on your screen using the mouse, you can press and concord the space key to move the entire region as your mouse moves without altering its size. This will be useful when you need a screenshot of a particular size and have already got the perfect fit, just not in the correct place. The system volition permit you lot to drag your capture box anywhere on the screen and capture anything that y'all wish.
Shift Key
This is exterior of the Shift keypress that you need to initiate the capture process. Pressing and holding shift during region capture volition let you change one dimension of the capture box without affecting the other. So, you can basically increase or decrease the size horizontally without changing vertical dimensions, and vice versa.
Choice Key
Pressing and property the Choice key during region capture will let you resize the capture box whilst taking its centre as the anchor and focal point. This means that you capture box will shrink and grow proportionately and equally in all dimension with reference to any was in the heart of the box. Useful if yous have a "must-have" kind of object in your screenshot and you desire to accept evenly distributed edges around information technology.
Irresolute default screenshot format in Mac Bone X
The recent iterations of OS Ten accept used PNG as the default screenshot format for quite some time now, just at that place are a number of other supported formats available that you lot can use, similar JPG, BMP, TIFF etc. Changing the default screen capture format requires using Terminal. Simply launch a new Terminal session and enter the following control:
defaults write com.apple.screencapture type image_format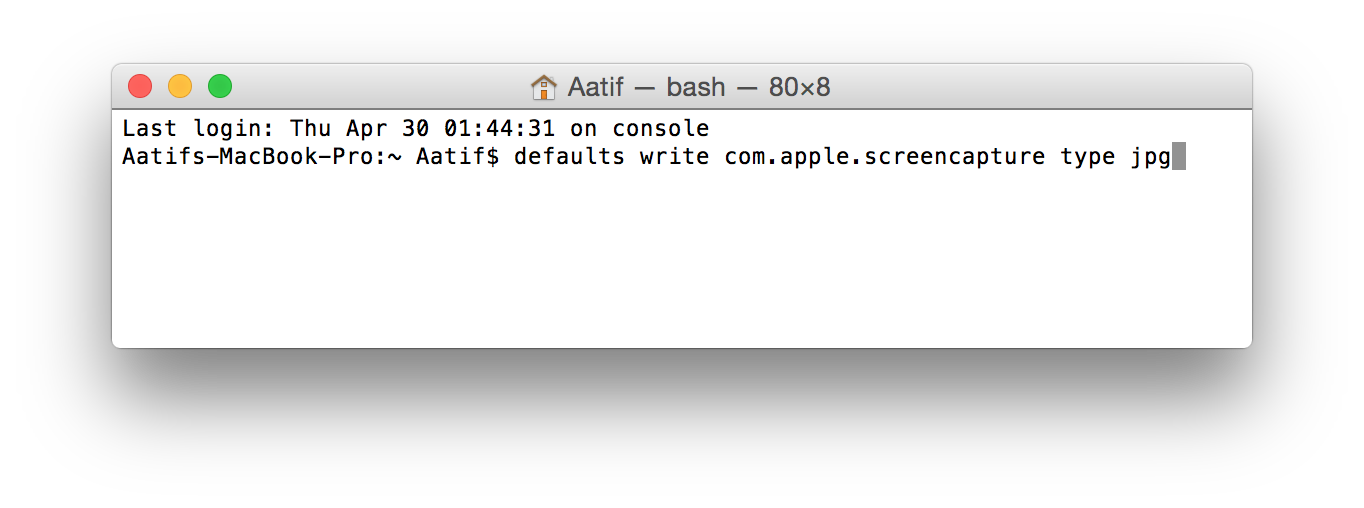
where image_format needs to exist replaced with whatsoever format you want to use, like jpg, for instance. Please notation that y'all will need to log out and log back in for the changes to accept result. Alternatively, y'all can utilise the post-obit command after the previous one for changes to take effect immediately:
killall SystemUIServer
Changing default screenshot location in Mac OS X
As we noted earlier, Os X saves screenshots by default to the Desktop on your computer. However, y'all can specify a different location to salvage images to. Allow'south say yous want to salve all screenshots to Pictures/Screenshots on your Mac. To do that, launch a Terminal session and enter the following control:
defaults write com.apple tree.screencapture location ~/Pictures/Screenshots/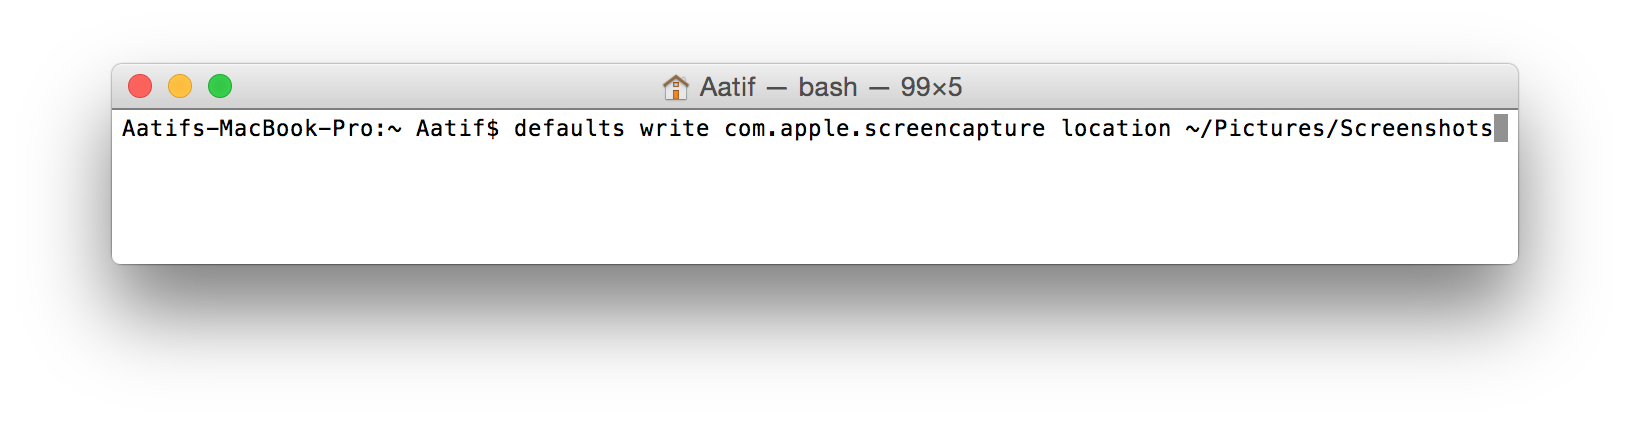
Y'all tin substitute the concluding bit with whatsoever path that you desire, and your screen captures will change their default relieve path. Y'all volition need to either log out and log back in, or utilise the killall control above for changes to take effect.
Taking a screenshot on a Mac using Terminal
As Concluding is one of the most powerful areas of a Mac, it should come as no surprise that you lot tin can take screenshots using the control-based utility too. The input for that volition look like:
screencapture -iW ~/Desktop/screen.jpg
While it might non seem very useful, this kind of method will piece of work all-time if you lot are doing some kind of scripting that required capturing screenshots.
Take a screenshot on a Mac Os Ten using Grab
Similar to the Snipping Tool in Windows, Apple, likewise, introduced a tool in Bone 10 that aims at facilitating this entire procedure with a GUI. The utility is called Grab and resides under Application/Utilities/Take hold of. Alternatively, you tin can also chop-chop find Take hold of using the Spotlight search that Os X has on offer.
I of the fundamental benefits that Grab offers over the keyboard-based methods is allowing timed screenshots, where the system will capture annihilation and everything on brandish 10 seconds after you lot've given the command. This allows a groovy style to showcase menus, tooltips, and anything else that might exist hard to capture using the other, conventional methods.
SEE ALSO: 10 Best Antivirus Software For Mac
That's pretty much there is to it when it comes to the default screen capture capabilities of a Mac. Every bit you'd observe, the native options are quite robust and powerful compared to a Windows organization, merely are as more than complicated. There are as well several 3rd-party tools that offer this kind of functionality with additional features, but that'south a discussion for a separate article.

Source: https://beebom.com/how-to-take-a-screenshot-on-a-mac/
Posted by: williamsmothas.blogspot.com
0 Response to "How To Take a Screenshot on a Mac"
Post a Comment